





External Solid-state Drives, or SSDs, are popular devices used to increase the storage capabilities of Macs. They are also used to store backup files and facilitate data sharing and transfer between different computers.
However, as is the case with any storage medium, you can lose data on these devices for various reasons: accidental deletion, formatting, file corruption, and more. This guide will cover the most effective methods to recover lost or deleted data from an external SSD on Mac. Let’s get started!
Causes Behind Data Loss on External SSDs
All digital storage mediums, including external Solid-state drives, are prone to unexpected data loss. Various factors contribute to this; here we will talk about the most common ones:
- File system corruption: A file system manages and tracks how data is stored on an external drive. Software errors, system crashes, abrupt power-cuts, or hardware failures can corrupt your file system.
- Accidental deletion: Sometimes, you accidentally delete files from your external SSDs. Typically, the system stores these files in the Trash folder, giving you a chance to recover them. But permanently deleting files or clearing Trash removes the file entries from your system’s directory, complicating the recovery process.
- Formatting: To prepare a storage device for an operating system’s use, one must format it, which requires setting up a file system. Formatting an external drive wipes out the current files and file system setup, replacing it with a new file system and removing all prior data.
- Presence of bad sectors: Unlike HDDs, which use mechanical parts, SSDs store data via NAND flash memory. Each read/write function on SSD causes the memory cells to experience minor degradation, causing bad sectors over time and rendering these memory cells inaccessible.
- File transfer errors: Connection issues, power outages, or sudden system crashes during file transfer can result in file corruption.
- Improper ejection: Abruptly removing the external drive from the computer while it’s still in use can also lead to data loss.
- Physical damage: Physical damage to the SSD caused by improper handling or extreme environmental conditions, such as excessive heat or moisture, can also lead to data loss.
Is it Possible to Recover Data from an External SSD on Mac?
Certainly! Data can indeed be recovered from an external SSD on a Mac. However, the success rate depends on different factors specific to each case of data loss. Let’s take a look at them in detail:
Is the TRIM Feature Enabled?
The TRIM command is the main reason why recovering data from SSDs is more difficult compared to traditional hard drives. Not just limited to Macs, this function improves performance by actively wiping the space where deleted files were stored, making it ready for new data.
Once the TRIM command does its job, the previously stored data is permanently erased, making recovery virtually impossible. To increase your chances of recovery, it’s important to disable the TRIM function as soon as you experience any data loss. Here’s how to do it:
Step 1: Launch the Terminal app using Spotlight.
Step 2: Execute the following command: sudo trimforce disable
Step 3: The system will display an important notice about the potential impact of disabling TRIM on your system. Type Y and press and Enter to confirm.
Have you Enabled Time Machine or Other Backups?
Another important thing to consider is whether you have enabled Time Machine or iCloud backup of your external SSD. If yes, then recovering your lost or deleted data becomes fairly easy. But if you haven’t backed up your external drive’s data, there are other solutions.
How to Recover Lost or Deleted Data from an External SSD?
Here are the best solutions to recover lost or deleted data from an external SSD on Mac. Give each method a try and see which one works out for you:
Method 1: Recover Lost or Deleted Files Using Trash
If you’re unable to find files on the external SSD, the first place to look for them is your Mac’s Trash. Deleted files stay in Trash until you empty the folder, and you can easily restore them. Here’s the rundown:
Step 1: Connect your external SSD to the Mac and open the Trash folder.
Step 2: Locate and select the deleted files within the Trash folder.
Step 3: Double-click on the selected files and choose Put Back.
Your files will be restored to their original location. If you can’t find your files in Trash, move on to the other methods listed below.
Method 2: Recover Lost or Deleted Files Using Backups
In a TRIM enabled External SSD, having backup of your data can be a lifesaver. In the following section, we’ll cover how to recover data from both iCloud and Time Machine backups.
- Recover Using iCloud
Backing up your data to iCloud enables you to retrieve it on any device, all you need is an internet connection and the credentials of your iCloud account. Here’s how to do it:
Step 1: Open your web browser, go to icloud.com, and sign in to your account.
Step 2: Click on the iCloud drive and browse through the folders to locate your files.
Step 3: Select the files you want to retrieve and click the download icon to restore them to your Mac.

Note: Files stored in iCloud’s Recently Deleted folder stay there for 30 days only.
- Recover Using Time Machine
Once set up, Time Machine, the built-in backup utility on Macs works in the background to automatically create incremental backups of your files and system. Here’s how to recover your files using Time Machine:
Step 1: Connect the Time Machine backup drive to your computer.
Step 2: Navigate to the folder containing your lost files.
Step 3: Now click the Time Machine icon in the menu bar and select Browse Time Machine Backups.

Step 4: Navigate to a previous date and time by using the timeline on the right or the navigation arrows before the file was erased.
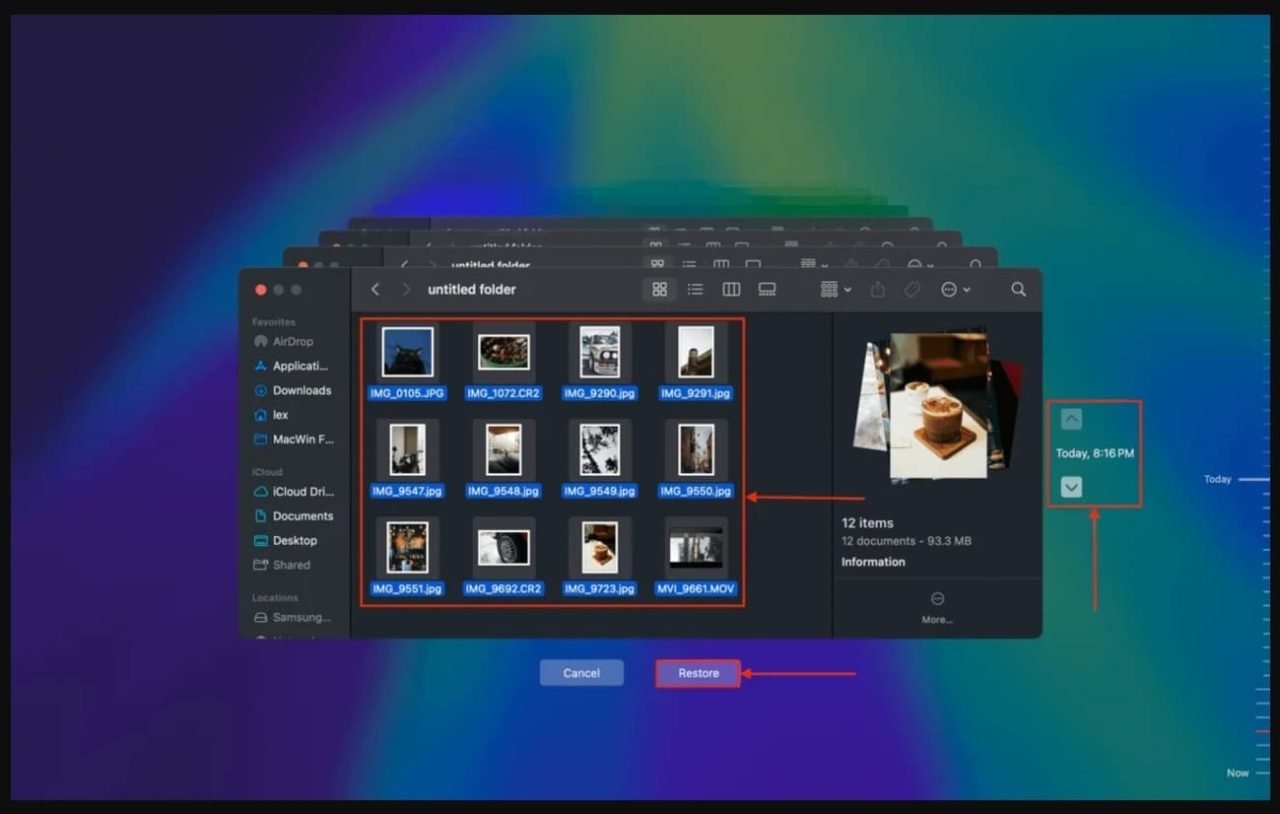
Step 5: Find the file, select it, and hit Restore to move it back to its original location.
Method 3: Recover Lost or Deleted Files Using Data Recovery Software
If haven’t backed up your external SSD using any of the methods discussed above, using a professional data recovery software for Mac is your best chance to get them back.
Stellar Data Recovery Professional for Mac is designed to rescue your lost or deleted files, folders, media, documents, and more. Whether you’ve cleared the Trash or wiped your external storage drive clean, this DIY tool can help rescue your files from a wide range of data loss scenarios.
Key features:
- Recovers data from SSDs, fusion drives, Time Machine backups, Thunderbolt 3 drives, and other USB storage media.
- Restores data from high storage capacity (>18 TB) storage drives.
- Recover data from formatted APFS/HFS+/NTFS/ExFAT volumes.
- Recovers data from crashed or non-booting Macs.
- Offers additional smart features, like drive health monitoring, cloning, and device optimization.
Follow the steps below to recover lost or deleted files using Stellar Data Recovery Professional for Mac:
Step 1: Download, install, and launch the software on your Mac.
Step 2: From the What to Recover screen, select the type of files you want to recover, and click Next.

Step 3: Next, select your external SSD as the storage drive to recover from and click Scan.

Step 4: The recovered files will be displayed for you to Preview.
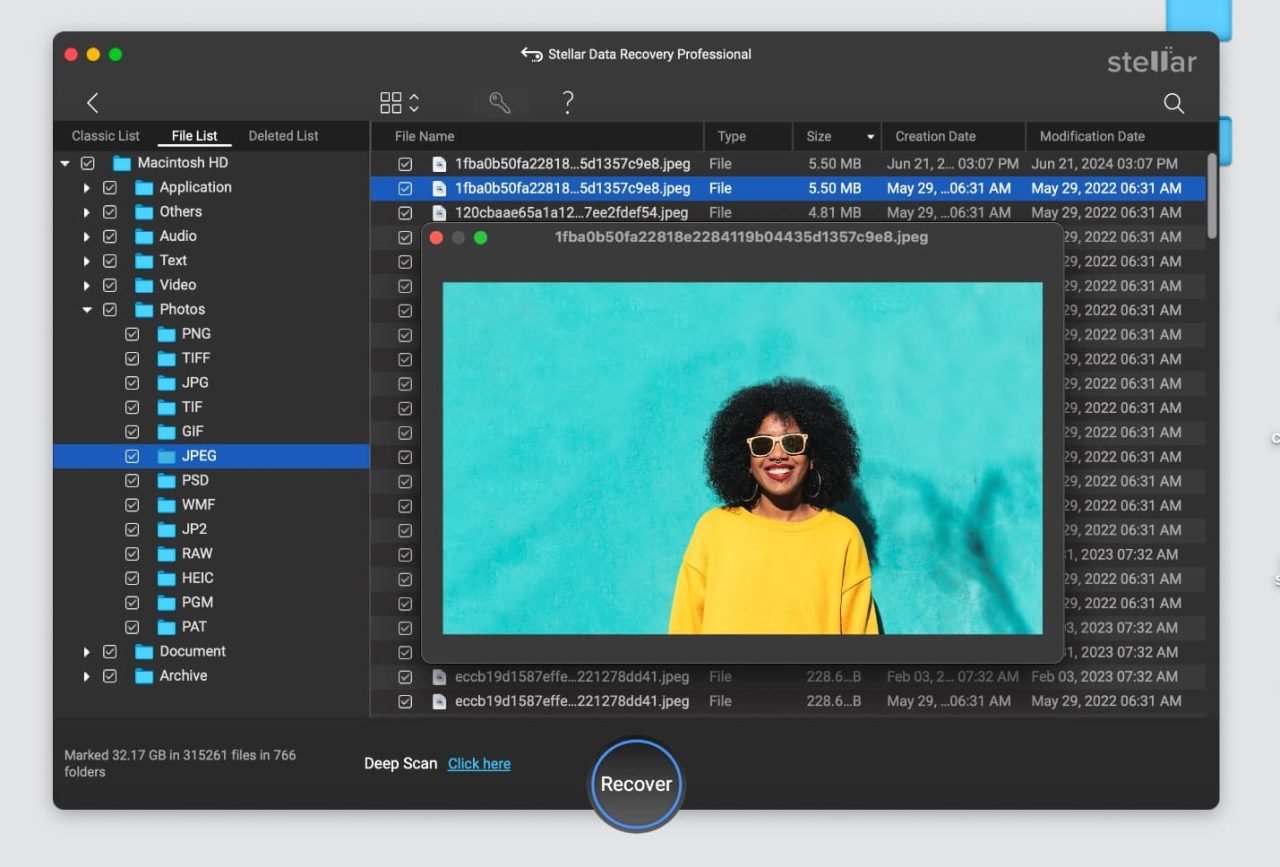
Step 5: Select the files you want and click Recover to move them back to your desired location.
Summing Up
Recovering data from an external SSD on Mac can be more challenging compared to HDDs, especially if the TRIM function is enabled. Having said that, you still have several methods at your disposal – checking Trash, restoring from backups, or using a professional Mac data recovery software to get your data back. Remember that taking prompt action will greatly increase your chances of a successful recovery.


